
Congratulations on receiving your brand-new Tamobyke T73 Pro Max!
With its dual-battery design, comfortable riding position, and powerful acceleration, the T73 Pro Max is built for riders who want both everyday practicality and weekend adventure.
Although assembling a new e-bike may seem intimidating at first, the process is actually quite simple. Most riders can complete the setup in around 30–45 minutes using the included tools.
This guide walks you through each step so you can get your bike safely assembled and ready for the road.
Before You Start
Tools Needed
-
Included T73 tool kit
-
10mm wrench
-
Standard bicycle pump
Helpful Tip
If possible, ask a friend to assist during the front wheel installation. It makes alignment much easier and helps avoid accidental scratches during assembly.
Step 1: Unboxing and Inventory Check

Inside the package, you’ll find:
• Bike frame • Front whee l• Dual batteries • Charger
• Pedals • Rear pegs • Front fender • Tool kit
Carefully remove the foam protection and zip ties before beginning assembly.
Important First Step
Unlock and remove both batteries before working on the bike. This reduces the overall weight and makes the setup process more manageable.
It’s also a good idea to do a quick inspection of the brake rotors, wiring, and tires before continuing.
Watch the process:Unboxing & Tools – 0:30
Step 2: Handlebar Installation

Attach the stem to the fork and tighten the bolts evenly.
While routing the cables, make sure nothing is twisted or stretched too tightly. Proper cable placement helps the steering feel smoother and prevents unnecessary wear over time.
The upright handlebar position on the T73 Pro Max is designed to keep longer rides more comfortable, especially for commuting or casual cruising.
Watch the process: Assemble Handlebars – 2:13
Step 3: Installing the Kickstand

Installing the kickstand early helps keep the bike stable while you continue the remaining setup steps.
Once mounted, double-check that the bolts are tightened securely before placing weight on it.
Watch the process: Kickstand Installation – 4:40
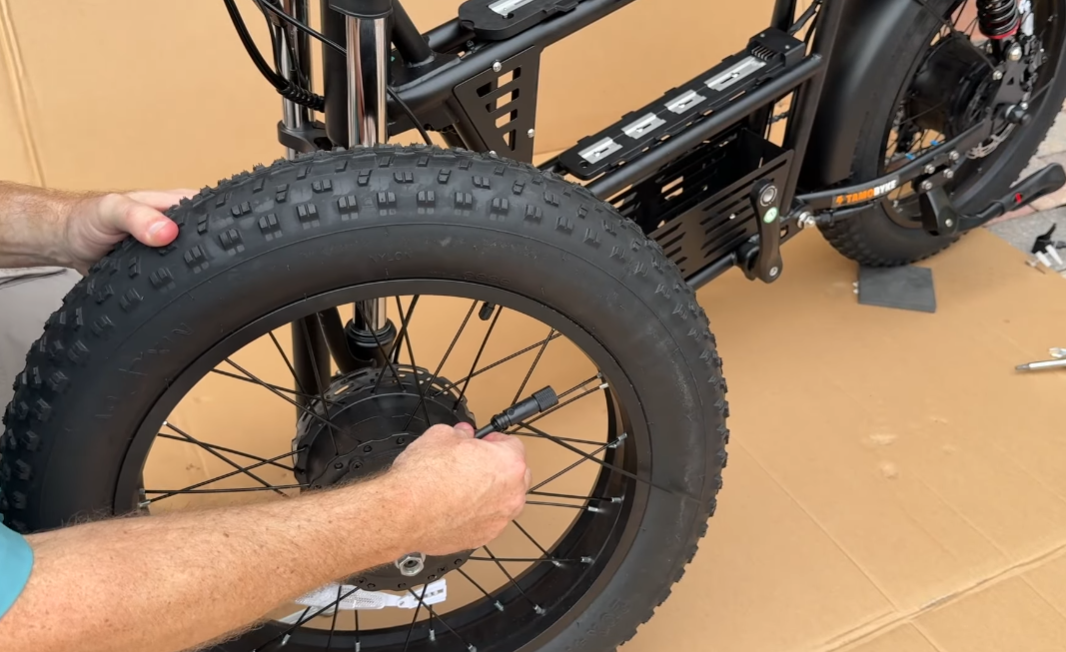
Step 4: Installing the Front Wheel

This is one of the most important parts of the assembly process.
Carefully guide the brake rotor into the caliper while aligning the axle correctly with the fork. Use the included washers to secure everything firmly in place.
For models equipped with a front motor, pay extra attention to cable routing and make sure the wire is clipped safely away from the spokes.
After installation:
-
Spin the wheel
-
Check for brake rubbing
-
Confirm the axle is tightened evenly
Watch the process: Install Front Wheel – 6:05
🛠️ If you need help during setup, you can always contact the
Tamobyke Support Team
for additional assistance.
Step 5: Fenders and Headlight

Attach the front fender using the provided bolts.
Besides improving the overall appearance of the bike, the fender also helps reduce water and dirt spray during wet rides.
Connecting the Headlight
When connecting the headlight cable, line up the arrows on both connectors before pushing them together.
Avoid forcing the connection, as the pins can bend if misaligned.
Watch the process: Fender & Headlight – 10:02
Step 6: Pedals and Final Check

Install the pedals carefully:
• Right pedal tightens clockwise
• Left pedal tightens counterclockwise
Start threading them slowly by hand to avoid damaging the crank arms.
Tire Pressure Recommendation
Inflate the tires to around 20 PSI for a balanced mix of comfort and stability.
Before your first ride, take a few minutes to:
• Check all bolts
• Test the brakes
• Inspect cable connections
• Verify tire pressure
Doing a final inspection now can prevent small issues later.
Watch the process: Install Pedals – 13:06
Step 7: Powering Up and Settings

Slide the batteries into place until you hear a secure click.
Then:
-
Turn on both batteries
-
Press the display power button
-
Check that the screen and lights are functioning properly
Switching Between MPH and KM/H
Hold the + and – buttons together for two seconds to access the settings menu.
From there, you can adjust speed units and other display preferences.
Watch the process: Power Up & Settings – 16:17
Ready for Your First Ride?
Your T73 Pro Max is designed to deliver a smooth and confident riding experience right from the start. Taking a little extra time during assembly helps ensure better performance, safer riding, and fewer adjustments later on.
If you're still exploring options or comparing models, you can browse the full
Tamobyke Electric Bike Collection
or learn more through the
Tamobyke Official Website.

Share:
Best Electric Bikes Under $800 (2026)
Best Electric Bikes for Hilly Commutes in 2026: Tamobyke T73 Max & V20 Pro Performance Review