Understanding Your E-bike LCD Display Functions
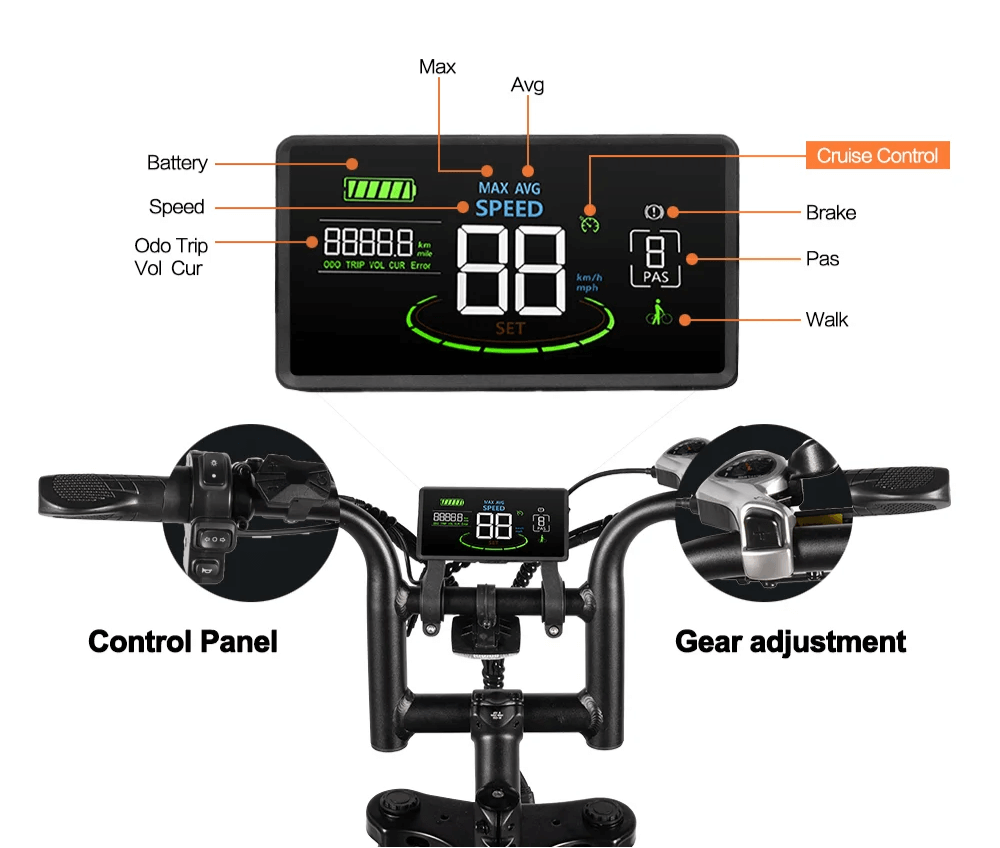
Most LCD screens provide essential information including speedometer readings, odometer tracking, and battery capacity monitoring. The electric bike display shows real-time data that helps riders make informed decisions about their ride:
Essential Display Metrics
Current Speed and Speedometer: The speedometer displays your current speed at all times, just like the speedometer in a car, which is an important safety feature especially for new riders unaccustomed to an ebike's high speeds.
Battery Level Monitoring: Battery level monitoring is vital as it helps riders manage their energy consumption effectively and allows cyclists to plan their routes better to avoid running out of battery mid-ride.
Odometer and Trip Distance: The odometer serves to motivate the rider and enables users to picture their objectives and watch them materialize on the screen.
Power Consumption (Watts): The watt function shows you the consumption of your power in real-time, helping riders know better about their eBikes and make the right decision on how much effort they need to reach their destination.
How to Access E-bike Display Settings
To enter the settings panel of most SW900/S830 LCD displays, press and hold the Up and Down arrows for 4-5 seconds. For LCD-S866 and M5 displays, press the up and down arrow buttons simultaneously for 5 seconds to enter advanced settings.
Common P-Settings Configuration
Most e-bike LCD settings use a P-parameter system for configuration:
P01 - Background Luminance: Controls screen brightness where 1 is the darkest and 3 is the brightest.
P02 - Distance Units: 0 for kilometers, 1 for miles - switches between measurement systems.
P03 - Voltage Settings: Configure for 24V, 36V, 48V, or 52V systems - the battery and kit voltages must match.
P04 - Sleep Timer: 0 means the LCD screen never goes off, other numbers set sleep time from 1-60 minutes.
P05 - PAS Assist Levels: 0 provides 3-grade mode, 1 provides 5-grade mode, affecting how much electric assist each grade provides from the battery.
Optimizing Pedal Assist Settings
Pedal assist configuration is crucial for e-bike performance optimization. Levels 1 and 2 are the finest options when you want to push a bit or increase battery range, while Level 3 is suitable for climbing hills or traveling at roughly 15 mph on flat ground.
Higher levels of pedal assistance typically result in shorter battery life, but maximum power output is produced at higher levels where bikers can easily attain speeds of 20 mph.
For detailed information about pedal assist systems, refer to this comprehensive guide on electric bike motor systems.
Advanced Display Features and Smart Connectivity
Modern electric bike displays offer enhanced functionality beyond basic metrics. Many e-bike manufacturers offer smartphone apps that can connect to your e-bike's display via Bluetooth, providing additional features like GPS navigation, fitness tracking, ride customization, and theft protection.
USB Charging and Additional Functions
Many displays include USB ports for charging devices during rides. This feature is particularly valuable for long-distance e-bike touring where maintaining device power is essential.
Troubleshooting E-bike Display Error Codes
Understanding e-bike error codes helps maintain optimal performance:
Different displays show various error codes - for LED displays, lights typically flash to indicate errors, while LCD displays show specific error numbers.
Common error codes include:
- Error 002: Brake system malfunction
- Error 003: PAS sensor issues
- Error 006: Low battery warning
- Error 008: Throttle problems
For comprehensive troubleshooting, consult the Electric Bike Review error code database.
Safety Considerations and Best Practices
Understanding your e-bike's LCD display is crucial for safety as it provides real-time feedback on your bike's performance and status - being aware of your speed helps prevent accidents, while monitoring battery levels ensures you won't be stranded due to power loss.
Display Maintenance Tips
Regular maintenance ensures your e-bike display continues functioning optimally:
- Keep the screen clean and protected from weather
- Avoid extreme temperature exposure
- Check connections regularly
- Update firmware when available
Choosing the Right Display for Your E-bike
When selecting displays, ensure compatibility with your e-bike model, look for user-friendly interfaces that are easy to read and navigate, and consider additional features like trip tracking and customizable settings.
For riders considering e-bike conversion kits, display compatibility is a crucial factor in the selection process.
Conclusion
Mastering your e-bike display settings transforms your riding experience from basic transportation to intelligent, data-driven cycling. Simple adjustments can transform your rides, extend your battery life, and leave you feeling empowered on every adventure.
Whether you're commuting daily or exploring new trails, properly configured display settings ensure you have the information needed for safe, efficient, and enjoyable e-bike adventures. Take time to familiarize yourself with your specific display model and experiment with different settings to find your optimal configuration.


Share:
Tamobyke's Complete Commuter E-Bike Package Deals
Smart Battery Systems: Revolutionizing E-bike Performance and Safety in 2025
2 comments
Hola Carlos,
Gracias por contactarnos. Hemos enviado un correo electrónico a tu dirección para ayudarte a resolver el problema con la pantalla que quedó en “P1”.
Si no ves nuestro mensaje, por favor revisa tu carpeta de spam o escríbenos directamente a support@tamobykesport.com
— nuestro equipo estará encantado de ayudarte paso a paso.
Saludos cordiales,
Tamobykesport Bike
como regreso la pantalla del display ya q se quedo e P1